- Home
- Knowledge Base
- SoftRAID
- Step-by-step instructions for changing the security settings for a Mac with Apple silicon
Step-by-step instructions for changing the security settings for a Mac with Apple silicon
Not required for macOS 13.3 (Ventura) or later.
 For more information and technical details, please read our blog post regarding Secure Boot and macOS or refer to the macOS User Guide.
1) Load Startup Options
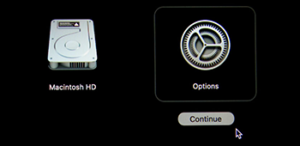
Shut down your Mac with Apple silicon, then press and hold the power button until “Loading startup options” appear.
2) Access Recovery Mode
Click Options, then click Continue.
3) Open Startup Security Utility
In the menu on top of the screen, choose Utilities > Startup Security Utility.

4) Open Security Policy
Select the system you want to modify, then click Security Policy.
5) Select Reduced Security
Select “Reduced Security” and enable “Allow user management of kernel extensions from identified developers” to allow installation of software that uses legacy kernel extensions.

6) Enter Administrator Password
When asked to authenticate, select an administrator account and enter its password to apply the changes to the security policy.
7) Restart System
In the Apple menu, choose Restart to restart the system.
Note: Startup Security settings on Apple silicon computers are not global. If you have more than one macOS installation, this needs to be set on each startup volume.
Important:
After installing the SoftRAID driver, a dialog box should pop up directing you to System Preferences/Security. Before restarting, click the button to go to System Preferences, unlock it, and click “Allow” for OWC as an identified developer. System Preferences will ask you to restart. Then click “restart later” and quit System Preferences. Navigate back to SoftRAID, and click on restart.
If you inadvertently click on SoftRAID’s restart button before going to System Preferences/Security, please be sure to go to System Preferences/Security immediately after the restart, or this option may no longer be available.
