
OWC Disk Performance
Windows 10 (version 1809 and later) changed the default disk removal policy from “Better performance” to “Quick removal” to prevent data corruption when users disconnect drives without using the “Safely Remove Hardware” function. While this protects your data, it can significantly reduce read/write performance.
If you’re experiencing slow speeds with your OWC storage, changing the removal policy back to “Better performance” can improve disk performance.
Understanding Windows Disk Removal Policies
- Quick removal (Windows default since October 2018):
- Safer option – disks can be disconnected directly without ejecting
- Ensures data integrity by constantly checking storage status
- Disables write caching - significantly reduces performance
- Windows checks storage status every millisecond, creating overhead
- Recommended only if you frequently disconnect drives without ejecting
Better performance:
- Enables write caching - improves read/write speeds
- Can significantly increase disk performance
- Requires following “Safely Remove Hardware” procedure before disconnecting
- Risk: Data loss or corruption can occur if drives are disconnected without proper ejection
- Recommended for storage that remains connected most of the time
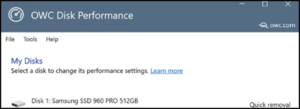
OWC Disk Performance Tool (Recommended Method)
OWC provides a free utility to easily change the Windows disk removal policy with just a click.
Download and Install
- Download OWC Disk Performance
- Launch the installer and follow the prompts
- No restart required after installation
- The tool will open automatically after installation completes
Change Removal Policy
- View your connected drives:
- The tool displays all connected external drives
- Most will show the default “Quick removal” setting
- Note: The disk label may show the drive’s internal make/model rather than the enclosure brand
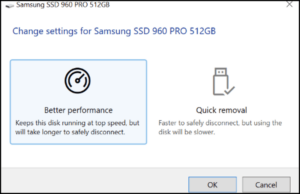
- Select a drive:
- Click on the disk label you want to change
- Choose your policy:
- Select ”Better performance” for improved speed
- Or select ”Quick removal” for safer disconnection
- Click OK
- Verify the change:
- Return to “My Disks” to see the updated setting
- The new setting is applied immediately
- No restart required
- Close the tool when finished
Important Notes About Policy Settings
Settings are computer-specific:
- The policy setting applies to the specific Windows computer, not the drive itself
- Connecting the drive to a different computer requires changing the policy again on that computer
- The setting does not “follow” the drive between computers
Settings persist:
- Once changed, the setting remains active until you change it again
- The setting persists even if you uninstall the OWC Disk Performance tool
- Nothing runs in the background – the tool simply changes a built-in Windows setting
Safely Remove Hardware reminder:
- If using “Better performance” policy, always use “How to safely remove drives from the computer” before disconnecting
- See our FAQ: How to safely remove drives from the computer for detailed instructions
Manual Method (Without OWC Tool)
If you prefer to change the policy manually without installing software:
- Connect the device to your computer
- Open File Explorer:
- Right-click Start
- Select File Explorer
- Identify the drive letter or label (e.g., “USB Drive (D:)”)
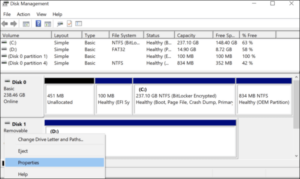
- Open Disk Management:
- Right-click Start
- Select Disk Management
- Access drive properties:
- In the lower section of Disk Management, find your drive
- Right-click the device label (not the volume)
- Select Properties
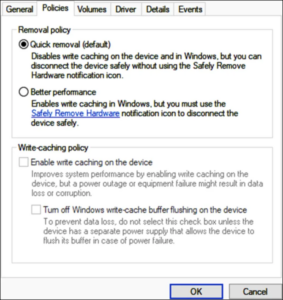
- Change the policy:
- Click the Policies tab
- Select your desired policy:
- Quick removal (safer, slower)
- Better performance (faster, requires safe ejection)
- Click OK
When to Use Each Policy
Use “Better performance” for:
- Desktop storage that stays connected most of the time
- External RAID arrays or multi-drive enclosures
- Drives used for video editing or large file transfers
- Any situation where maximum performance is needed
Use “Quick removal” for:
- USB flash drives that are frequently connected/disconnected
- Portable drives you move between multiple computers
- Any drive where you might forget to eject properly
- Situations where data safety is more important than speed
Performance Impact
Changing from “Quick removal” to “Better performance” can result in:
- Significantly faster write speeds (write caching enabled)
- Improved sustained transfer rates for large files
- Better performance during multiple simultaneous operations
- Reduced system overhead (Windows not constantly checking storage status)
The performance improvement varies by:
- Drive type (SSD vs. HDD)
- Connection interface (USB 3.0, USB4, Thunderbolt)
- Workload (large sequential files vs. many small files)
Troubleshooting
Drive doesn’t appear in OWC Disk Performance tool:
- Ensure the drive is properly connected and appears in File Explorer
- Try disconnecting and reconnecting the drive
- Restart the OWC Disk Performance tool
Setting doesn’t seem to apply:
- Verify the change in Disk Management manually (see Manual Method above)
- Restart your computer
- Reinstall the OWC Disk Performance tool
Still experiencing slow speeds after changing policy:
- Check USB/Thunderbolt cable quality
- Try a different USB/Thunderbolt port
- Update drive enclosure firmware (if available)
- Test the drive on a different computer